|
|
index  install install_wifi_hotspot install install_wifi_hotspot
Install - Lithiumate Wireless Advisor
Installations instructions for the WiFi hotspot

- Connect the power wires (black and red) to a 12 V source (e.g.: ignition) capable of supplying 0.3 A
- Lithiumate Pro: connect to pin 2 of the white control connector to power the hotspot whenever the BMS is on
- Lithiumate Lite: connect to the ignition line (when AC powered, the internal power supply of the Lite is too weak to power the hotspot)
- Connect the USB extension cable to the Lithiumate:
- Lithiumate Pro: connect to the RS232 port through a USB-RS232 adapter dongle that uses the FTDI FT232R IC (shipped as part of the Lithiumate Starter Kit)
- Lithiumate Lite: connect to the USB port through a USB cable (part of the Lite kit)
- Power-up the Lithiumate Wireless Advisor (the power-up sequence takes 50 seconds to complete)
- Power-up the Lithiumate
- Wait 50 s for the Lithiumate Wireless Advisor to start its WiFi connection
- WiFI connection:
- Select the "Lithiumate" WiFi connection
- Use "elithion" (all lower case) as the password
- Android:
- Home key
- Control key
- Select "Wireless & Networks"
- Select "Wi-Fi Settings"
- Click "Wi-Fi" to turn it on
- Find the "Lithiumate" network and click it
- Enter "elithion" as the password
- Click "Connect"
- Note that the screen shows "Acquiring IP" and then "Connected"
- Screen Timeout in smartphones:
- Increase the Screen Timeout, so that the screen will not dim during use:
- Android:
- Home key
- Control key
- Select "Settings"
- Select "Display"
- Select "Screen Timeout"
- Select "30 minutes"
- Home key
- Browser
- Open a browser
- Type "10.1.1.1" in the URL bar; the Lithiumate Wireless Advisor window with be displayed
- Bookmark that page
The GUI shows the status of the BMS (Rev 1.00 of the GUI shown).
Smartphone:
- Scroll down a bit to move the URL bar out of the way
- Optimize for your smartphone screen by pinching to reduce or enlarge the display
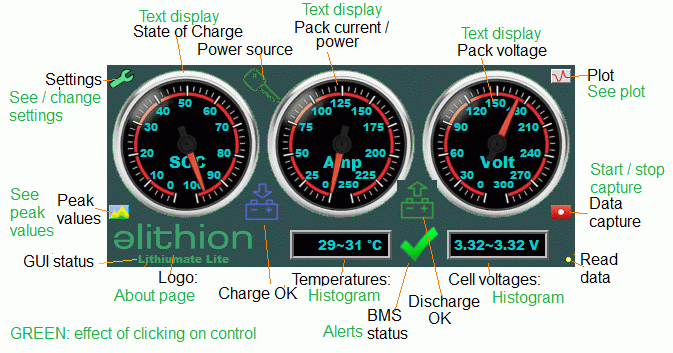
Click (or touch) particular areas to get additional information.
Form top to bottom, left to right:
- Wrench icon: the "Settings" dialog:
- Range for the current meter for when the BMS is powered by the source (e.g.: AC powered)
- Whether the current meter, when the BMS is powered by the source, ends at 0 Amp or at positive Amp
- Range for the current meter for when the BMS is powered by the load (e.g.: ignition)
- Whether the current meter, when the BMS is powered by load, starts at negative Amps at 0 Amp
- Settings are stored in your wireless device as cookies (not in the Lithiumate Wireless Advisor, nor in the BMS)
- When done, click the red "Close" icon at the top right
- Each of the 3 meters: the "Value" display:
- Display the actual value of SOC, Current or Voltage.
- Click the display, or the meter, to hide
- Elithion logo: the "About" dialog:
- Rev levels (with a link to download a new rev of the GUI software)
- Cycle number and power-up time
- Cell temperatures box: histogram
- Each bar represents the temperature of a cell, from 0 (most positive cell) on the left, to N-1 (most negative cell) on the right
- Green = OK, Orange = marginal, Red = too cold or too hot (as set by the BMS configuration)
- To display a cell's number and temperature, hover over a bar (computers with a mouse) or click on the bar (any computer)
- To close, click on the Cell temperatures box again
- Alarm icon: Status details
- Warnings and faults, and their causes
- Charging and discharging limits, and their causes
- Cell voltages box: histogram
- Each bar represents the voltage of a cell, from 0 (most positive cell) on the left, to N-1 (most negative cell) on the right
- Green = OK, Orange = marginal, Red = too low or too high (as set by the BMS configuration)
- To display a cell's number and voltage, hover over a bar (computers with a mouse) or click on the bar (any computer)
- To close, click on the Cell voltages box again
To close a dialog, click that area again, or click the dialog.
The yellow dot on the top right corner blinks whenever data are acquired from the BMS (it doesn't blink if the BMS is off or disconnected).
Click (or touch) particular areas to get additional information.
Form top to bottom, left to right:
- Wrench icon: the "Settings" dialog:
- Range for the current meter for when the BMS is powered by the source (e.g.: AC powered)
- Whether the current meter, when the BMS is powered by the source, ends at 0 Amp or at positive Amp
- Range for the current meter for when the BMS is powered by the load (e.g.: ignition)
- Whether the current meter, when the BMS is powered by load, starts at negative Amps at 0 Amp
- Settings are stored in your wireless device as cookies (not in the Lithiumate Wireless Advisor, nor in the BMS)
- Whether the middle meter shows current or power
- When done, click the red "Close" icon at the top right
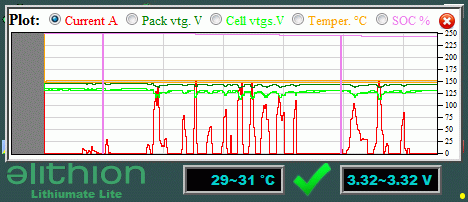
- Plot icon: the graph of main parameters vs. time (see below).
- Each of the 3 meters: the "Value" display:
- Display a digital value of the SOC, Current (or power) or Voltage.
- Click the display, or the meter, to hide
- Peak icon: the "Peak data" dialog:
- List of peak values
- Trip meter: energy since the last time the GUI was started
- Elithion logo: the "About" dialog:
- Rev levels (with a link to download a new rev of the GUI software)
- Cycle number and power-up time
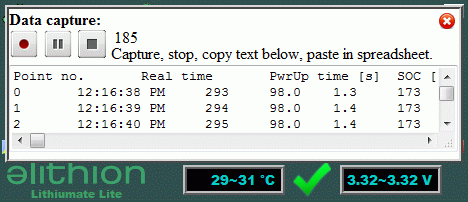
- Recording logo: the "Data capture" dialog (see below)
- Cell temperatures box: histogram
- Each bar represents the temperature of a cell, from 0 (post positive cell) on the left, to N-1 (most negative cell) on the right
- Green = OK, Orange = marginal, Red = too cold or too hot (as set by the BMS configuration)
- To display a cell's number and temperature, hover over a bar (computers with a mouse) or click on the bar (any computer)
- To close, click on the Cell temperatures box again
- Green = within limits; Orange = at the edge of the limits; Red = outside the limits
- BMS status icon: the "Status details" dialog:
- Warnings and faults, and their causes
- Charging and discharging limits, and their causes
- Cell voltages box: histogram
- Each bar represents the voltage of a cell, from 0 (post positive cell) on the left, to N-1 (most negative cell) on the right
- Green = OK, Orange = marginal, Red = too low or too high (as set by the BMS configuration)
- To display a cell's number and voltage, hover over a bar (computers with a mouse) or click on the bar (any computer)
- To close, click on the Cell voltages box again
- Green = within limits; Orange = at the edge of the limits; Red = outside the limits
To close a dialog, click the "close" icon in the top left corner of the dialog, or open a different dialog.
The yellow dot on the bottom right corner blinks whenever data are acquired from the BMS (it doesn't blink if the BMS is off or disconnected).
The traces are color coded, same color as the legend, above.
The horizontal scale is one pixel / second.
The plot has a vertical marker every minute, and can hold about 7 minutes of data
The vertical scale for each parameter is the same as for the main screen.
Click on a parameter (at the top) to select which item's units are shown on the Y-axis.
- Press the Start button; the data start filling the text area, once / second
- Optionally, press the pause button to toggle recording off and on
- When done, press the stop button; the data are selected
- Copy the data and paste to a text file or to a spreadsheet, for analysis
You may upgrade the GUI software on your own:
- Contact Elithion to request the latest Lithiumate Wireless Advisor software
- Receive the Lithiumate Wireless Advisor software in the wireless device that you use to connect to the Lithiumate Wireless Advisor
- Connect to the Lithiumate Wireless Advisor with that wireless device
- In the Lithiumate Wireless Advisor GUI, click the Elithion logo; the About dialog will open
- Click the "Upgrade" link; the download page will open (if the GUI page is corrupted, you can open the download page directly: 10.1.1.1/dl.html)
- Click "Browse", find the upgrade file on your drive and click "OK"
- Click "Upload"; the upload script page will open; when done, it will indicate success
- Use the "Back" function of your browser, twice, to return to the GUI
- Use the "Refresh" function of your browser to start using the new version of the GUI software
Starting from rev 1.03 of the GUI, you may change the name (SSID) of the Wireless Advisor's WiFi link on your own:
- In the drive of your wireless device, create a new text file. Name it wifiname.txt (all lower case)
- Open that file, and enter a single word: the new name for the WiFi SSID (e.g.: bms1)
- In the Lithiumate Wireless Advisor GUI, click the Elithion logo; the About dialog will open
- Click the "Change WiFi" link; the download page will open
- Click "Browse", find the wifiname.txt file on your drive and click "OK"
- Click "Upload"; the upload script page will open; when done, it will indicate success
- Use the "Back" function of your browser to return to the Upload page
- Click "Upload"; again (this is a workaround to force writing the file into FLASH memory)
- Cycle the power of the Wireless Advisor off and on
- The Wireless Advisor will start using the new WiFi name
To restore the default WiFi SSID:
- In the drive of your wireless device, create a new, blank text file. Name it wifiname.txt (all lower case) (Or, open the present wifiname.txt file and delete all its contents)
- In the Lithiumate Wireless Advisor GUI, click the Elithion logo; the About dialog will open
- Click the "Change WiFi" link; the download page will open
- Click "Browse", find the wifiname.txt file on your drive and click "OK"
- Click "Upload"; the upload script page will open; when done, it will indicate success
- Use the "Back" function of your browser to return to the Upload page
- Click "Upload"; again (this is a workaround to force writing the file into FLASH memory)
- Cycle the power of the Wireless Advisor off and on
- The Wireless Advisor will start using the default WiFi name: Lithiumate
Note: the password cannot be changed: it is still elithion (all lower case).
|
Electrical:
| Item
| Conditions
| Min
| Nom
| Max
| Units
|
| Supply voltage
|
| 7
| 12
| 18
| Vdc
|
| Supply current
| 12 Vdc
|
| 200
|
| mA
|
| Power-up time
|
|
| 50
|
| s
|
| WiFi format
|
|
| 802.11
|
|
|
|
Mechanical:
| Item
| Conditions
| Min
| Nom
| Max
| Units
|
| Dimensions
|
| 168 x 84 x 28
| mm
|
|
| 6.6 x 3.3 x 1.1
| inch
|
| Mass
|
|
| 227
|
| g
|
| Weight
|
|
| 8
|
| oz
|
| USB cable length
|
|
| 1.7
|
| m
|
|
|
| 5
|
| feet
|
|

|
|