
These are the installation and configuration instructions for the Touch-screen SOC display, 6DR0007T.
The display comes in a case for table-top placement.
If mounting to a panel:
- Remove the case
- Cut a rectangular opening in the panel
- Insert the display into that opening, from the front
- Secure the display to the back with two brackets screwed into the 4 threaded holes in the back of the display
Connect the DC-DC converter:
- Connect the USB connector to the display.
- Connect the red wire of the + of the 12 V supply that powers the BMS
- Connect the black wire of the - of the 12 V supply
Connect the BMS:
- Lithiumate Pro, using a RSS232-USB adapter
- Connect the DE9 end of the adapter to the Lithiumate Pro master
- Connect the USB end of the adapter to the display
- Lithiumate HD, using a Micro-B USB cable
- Connect the USB cable to the Lithiumate HD master
- Connect the USB cable to the display
You may monitor the display's real time data through the Internet.
- Connect your Display through the Internet (through a cable or through WiFi)
- Enable remote monitoring in the Settings screen of the Display
- On the remote computer, go to elithion.com/rm
- Enter the serial number of your display (listed in the "Remote Monitor" screen)
To change the settings:
- Touch the "Menu" "hamburger" icon on the top right of the display; the "Menu" screen opens
- Touch the "Settings" "gear" icon on the top right of the display; the "Settings" screen opens
- Set the preferences (see below)
- Touch the green "✔" to save the changes and return to the Menu screen
- Or, to cancel, Touch the green "✖" to return to the Menu screen without saving the changes
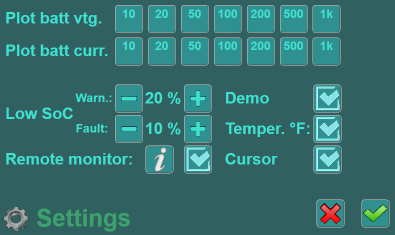
Settings screen
The SoC text changes color based on thresholds:
- Above warning threshold: green
- Below fault threshold: red
- Between thresholds: ranges gradually from green through yellow to red
To set the thresholds, touch the "+" to increase the threshold you want to change, or "-" to decrease it.
The Demo Mode imitates a BMS to demonstrate the functionality of the display.
To toggle the Demo Mode on or off, touch the "Demo" checkbox.
If Remote monitoring is enabled, and the display has Interenet connection, anyone who knows its serial number can view its data in a webpage. .
To toggle enabling remote monitoring, touch the "Remote monitor" checkbox.
The main screen can show temperature in °C or °F.
To toggle between the two, touch the "Temper. °F" checkbox.
Normally you do not want to see the curson in a touchscreen.
To toggle visibility of the cursor, touch the "Cursor" checkbox.
Internet connection can be through an Ethernet cable or a WiFi network.
To connect to a WiFi network:
- Touch the "Menu" "hamburger" icon on the top right of the display; the "Menu" screen opens
- Touch the "WiFi setup" icon near the top right of the display; the first "WiFi setup" screen opens
- Touch a WiFi network name to select it (or select "Disconnect"); the second "WiFi setup" screen opens
- Using the displayed keyboard, enter the password for that WiFi network; note the "Shift" key at the bottom left, and the "Backspace" key at the top right
- Touch the green "✔" to save the changes and return to the Menu screen
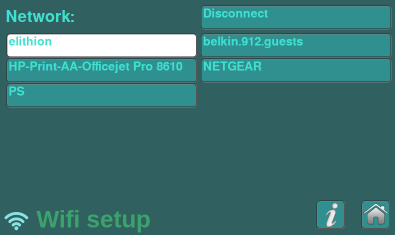
WiFi network screen
The Internet connection status is indicated by an icon at the bottom left corner of the main screen.

Internet status icons: L to R: remote monitor disabled, remote monitor enabled but no Internet connection, remote monitor enabled and Internet connection
To log data to a USB drive:
- Install a USB drive on a USB port of the display
- Touch the "Menu" "hamburger" icon on the top right of the display; the "Menu" screen opens
- Touch the "Log data" icon; the first "Log data" screen opens
- Select a rate (how often data are captured)
- Touch the red circle "Record" button to start recording onto a file named "lithiumatedata_1.csv"; the number of the data point is updated each time a new set of data are captured
- Touch the black square "Stop" button to stop recording and close the file
- To start a new file, touch the "Record" button again; the new file is named "lithiumatedata_2.csv"
- Touch the black trangle "Eject" button to safely unmount the USB drive
To view the data in the USB drive:
- Remove the USB drive
- Install on a computer
- Open the csv file with a spreadsheet program
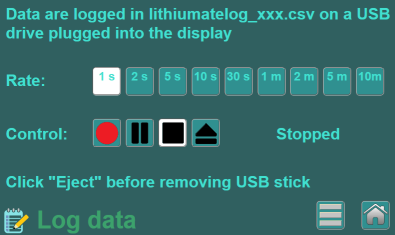
Data log screen
You may customize the utility to show your company's logo and a custom background,
Prepare a new background image
- Background:
- Size: 798 x 478
- Preferred base color #204040
- Logo:
- Max size: 300 x 100
- Suggested colors:
- Background: #204040 (make transparent)
- Foreground: #3CA26C
- Place logo on background
- Suggested position of bottom right corner: 778 x 458
- Save the final image as bkgnd.png
- Copy onto a USB drive
- Save the final image as bkgnd.png
- Copy onto a USB drive
Replace the old background image.
Requires a USB keyboard and a mouse.
- Connect the USB keyboard and mouse to USB ports of the display
- Press Ctrl-shift-Q to quit the browser
- Plug the USB drive to a USB port
- Copy the bkgnd.png file from the USB drive
- Paste the file in the folder /home/pi/Elithion/static, replacing the original one
- Safely eject the USB drive by clicking the up-arrow icon in the top right corner of the menu bar
- Restart the touch-screen display
You may want to only show the main screen, by disabling the menus and other screens.
WARNING! once you remove the menus, there is no longer a menu to undo this change!
- Make sure that the display is connected to the BMS
- Remove power just to the BMS
- Restart the touch-screen display: cycle the power to the display off, then on
- Navigate to Main menu / Settings
- Uncheck the "Menus, overlays" setting; a dialog appears asking you to confirm
- Confirm by pressing OK
- Click the Home icon
- Restore power to the BMS
- Restart the touch-screen display: cycle the power to the display off, then on