Meter installation
Wire to meters / gauges on the dashboard
|
You may use meters on the dashboard to indicate pack status:
- Voltage
- Current.
- State Of Charge (SOC).
The Lite is designed to drive standard Westach analog meters.
Other brands will work as well, and digital meters will work as well,
but Elithion and Westach have already collaborated to come up with the ideal line of meters for the Lite, so that is what we recommend using.
Please understand that there are two different definition for a meter's full scale range:
- The dial full scale: the value printed on the right end of its dial (that the needle points to when it's at its maximum deflection)
- The movement full scale: the physical voltage or current that will actually result in that maximum deflection
|
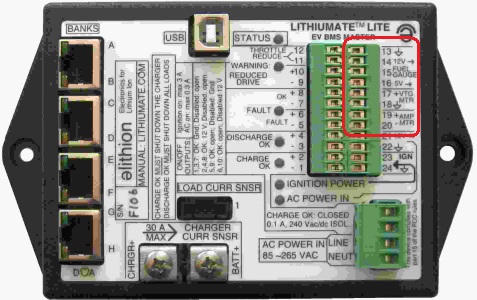
Connection location.
|
Yes, for many meters the two are the same: a 100 V meter that actually takes 100 V full scale, or a 1 A ammeter that actually takes 1 A into it for full scale.
However, in this application, the dial full scale and the movement full scale are always different:
all these meters must have a 5 V movement's full scale voltage, and none have a 5 V dial full scale.
Even the pack ammeter is just a simple 5 V voltmeter, one that happens to have a dial labeled in Amps.
For the SOC meter, you can use instead a standard Fuel Gauge.
Two things determine the range of a meter:
- The digits printed on the meter's dial
- The configuration of the Lite (done later, through a computer), to match what the dial says
Regardless of the full scale voltage of the Pack Voltage meter's dial (say, 50 V, 200 V or 500 V),
the Lite will drive the meter up to 5 V,
as the pack voltage reaches that full scale voltage.
|
The pack voltage meter's dial ranges either between 0 V and a full scale voltage, or between a minimum and a maximum voltage ("offset scale").
Find an available voltmeter with a 5 V movement,
and with a dial that covers the range of your pack voltage;
the left end voltage can be 0 V (standard) or some voltage less than the minimum pack voltage (offset scale);
the right end voltage must be above the maximum pack voltage.
When the meter is not powered, its needle must rest on the left end of the dial.
- Install the meter on the dashboard
- Run two wires from the meter to the BMS master
- Connect one wire to the '+' terminal of the meter, and to the "VTG MTR +" screw terminal of the BMS master's control connector (# 17)
- Connect the other wire to the '-' terminal of the meter, and to the "VTG MTR -" screw terminal of the BMS master's control connector (# 18)
- Later, during configuration, you will tell the BMS master what the dial of the meter says, so that the BMS master can drive the meter accordingly
|
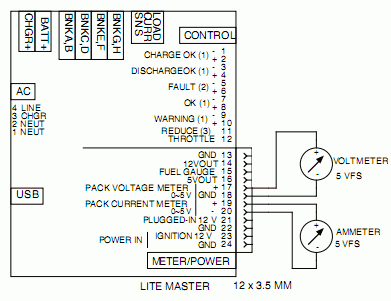
Wiring a pack voltage meter to the Lithiumate Lite master
|
|
The pack current meter's dial ranges between a full scale charge current (on the left) and a full scale discharge current (on the right).
Find an available meter with a 5 V full scale movement voltage,
and with a dial that covers the range of your pack current;
the left end current can be 0 A (if you don't need to measure the charging current)
or some current less than the maximum charging current (don't forget regen current);
the right end current must be above the maximum discharging current.
It will be easiest to find meters that have a left end label of 0 A (normal meter),
or meters that have the 0 A label in the middle (center-zero meter).
However, it is possible to have the 0 anywhere in the dial, as long as the adjustment (through the screw in the front panel) enables it.
When the meter is not powered, its needle must point to the '0'.
- Install the meter on the dashboard
- Run two wires from the meter to the BMS master
- Connect one wire to the '+' terminal of the meter, and to the "AMP MTR +" screw terminal of the BMS master's control connector (# 19)
- Connect the other wire to the '-' terminal of the meter, and to the "AMP MTR -" screw terminal of the BMS master's control connector (# 20)
- Later, during configuration, you will tell the BMS master what the dial of the meter says, so that the BMS master can drive the meter accordingly
|
Wiring a pack current meter to the Lithiumate Lite master
|
For an SOC meter, you have 2 options:
- A 5 V full scale voltmeter
- A standard car's fuel gauge (the BMS master emulates a fuel tank sender)
By the way, note that the correct spelling is "gAUge" or "gAge" (pronounced "gayj");
("gUAge", which would be pronounced "gwaj", is wrong).
|
Find an available meter with a 5 V movement full scale voltage,
and with a dial that goes from 0 % to 100 % (or from 'E' to 'F').
- Install the meter on the dashboard
- Run two wires from the meter to the BMS master
- Connect one wire to the '+' terminal of the meter, and to the "5 V" screw terminal of the BMS master's control connector (# 16)
- Connect the other wire to the '-' terminal of the meter, and to the "FUEL GAUGE" screw terminal of the BMS master's control connector (# 15)
- Install a 500 Ohm resistor across the meter terminals
Later, during configuration, you will tell the BMS master what you are using a 5 V meter, so that the BMS master can drive the meter accordingly
|
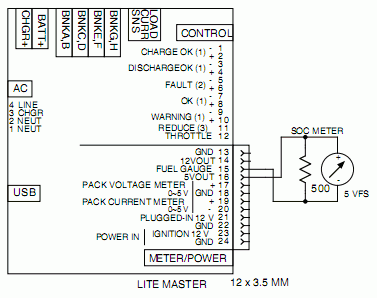
Wiring an SOC meter to the Lithiumate Lite master
|
For the SOC meter, you can also use a standard Fuel Gauge, either one already present in a vehicle, or a new one.
|
If a new gauge:
- Install it on the dashboard
- Run three wires from the gauge to the BMS master
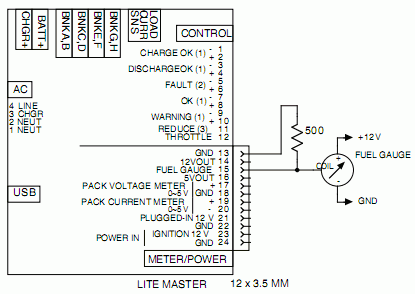
- Connect one wire to the '+' terminal of the fuel gauge, and to the "12 V" screw terminal of the BMS master's control connector (# 14)
- Connect the second wire to the '-' terminal of the meter, and to the "GND" screw terminal of the BMS master's control connector (# 13)
- Connect the third wire to the 'COIL' terminal of the meter, and to the "FUEL GAUGE" screw terminal of the BMS master's control connector (# 15)
- Install a 500 Ohm resistor between the "FUEL GAUGE" and the "GND" terminals (# 13 and 15)
|

Wiring a new, standard fuel gauge to the Lithiumate Lite master
|
|
If an existing gauge, already wired in the car, its '+' wire is already wired to the 12 V power,
so all you need is to do is to connect its '-' wire to the BMS master:
- Find the wire that goes from the gauge to the sender (test to make sure it's not the grounded sender wire)
- Connect that wire to the "FUEL GAUGE" screw terminal of the BMS master's control connector (# 15)
- Install a 500 Ohm resistor between the "FUEL GAUGE" and the "GND" terminals (# 13 and 15)
|
Wiring an existing, standard fuel gauge to the Lithiumate Lite master
|
Later, during configuration, you will tell the BMS master what you are using a fuel gauge,
and set the Empty and Full set-points,
so that the BMS master can drive the meter accordingly