|
|
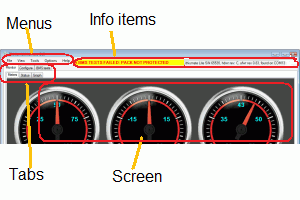
Application
Reference for the Lithiumate Lite PC application
The Lithiumate Lite GUI (Graphics User Interface) application runs on a Windows computer
and allows you to configure, monitor and test a Lithiumate Lite BMS.
The Lithiumate Lite uses a chip from FTDI to drive its USB port.
Upon connecting the Lithiumate Lite to a Windows Computer through the USB cable, the computer should automatically obtain and install the driver for the FTDI chip.
After a while, Windows should report that the drivers were succesfully installed and the device is ready of use.
Should Windows not find the driver, you will have to download the driver from the FTDI site.
To see if your computer is 32 bits or 64 bits, right click on the "Computer" icon (or the "Computer" item in the Start menu) and select properties.
A dialog will open.
In the "System" section, the last line says: "System type:" and then either "32-bit Operating System" or "64-bit Operating System".
|
Note: do not confuse the installer and the installed application:
- The installer is called "LithiumateLiteGUI.application" and will be in your download folder; you can delete it after you're done with it
- The installed application is called "LithiumateLiteGUI" and will be in Start menu / All programs / Elithion / Lithiumate GUI
(Sorry about the complexity, but this is a Microsoft .NET thing, and we have no control over it.)
Note: the computer that you will be using to talk to the Lithiumate Lite requres Internet access only when installing the application;
afterward, Internet access is desirable (to get updates) but not required
|
|
- With Internet access, downolad the Lithiumate Lite GUI installer to the hard drive of a Windows PC
- With Internet access, run the installer ("LithiumateLiteGUI.application") to install the actual application ("LithiumateLiteGUI") on your computer
- Connect the computer to the Lite BMS using a USB cable
- Wait for Windows to install the driver for the USB device
- Power-up the BMS master
- Start the Lithiumate Lite GUI application, "LithiumateLiteGUI", installed on your computer (NOT the "LithiumateLiteGUI.application" installer)
NOTE: When using the GUI application, to see detailed information on a given item, hover over that item.
|
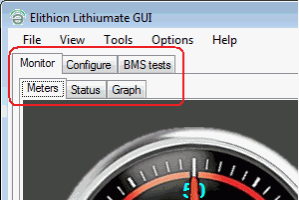
The application offers:
The application offers 5 tabbed screens:
|
|
gui_map
|
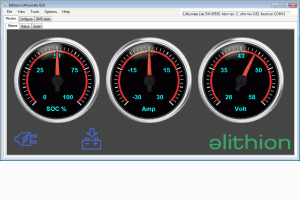
This screen reports the basic status of the BMS through 3 analog meters and 6 indicators, in very simple terms, in order not to overwhelm the unsophisticated user.
- Meters
- Battery SOC
- Battery current
- Battery voltage
- Indicators
- AC power
- Ignition power
- Charging OK
- Discharging OK
- Warning
- Fault
|
|
|
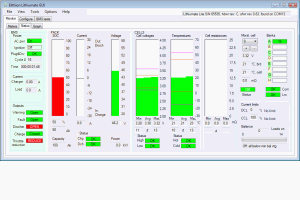
This screen displays the entire present status of the BMS.
The status items are grouped into:
- BMS: state of the BMS itself: power, time, current sensors, outputs
- PACK: state of the pack: SOC, voltage, current
- CELLS: state of banks and cells: voltages, temperatures, resisatnces, balance, communication
|
|
|
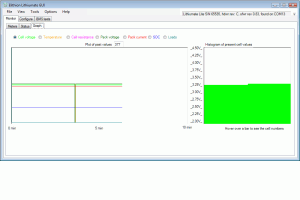
This screen graphs the status of the BMS.
- Plot of certain parameters over time
- Histogram of the present value of certain parameters
The parameters are shown are selectable.
|
|
|
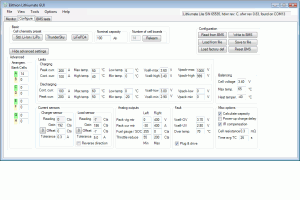
This screen displays the configuration settings of the BMS master and offers a way to change them.
The settings are grouped into:
- Basic
- Advanced
- Cell and bank arrangement
- Limit values
- Current sensor parameters
- Analog output settings
- Fault limits
- Balancing parameters
- Miscellaneous options
|
|
|
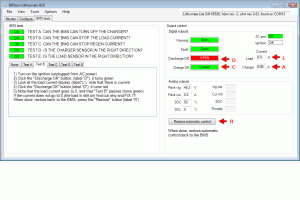
This screen displays the result of BMS tests, offer tools to force outputs to test the system.
The settings are grouped into:
- BMS test results and instructions to pass a test
- Output control, which allow you to force the state or value of an output
- Digital outputs
- Analog outputs
After done forcing the outputs, click the "Restore automatic control" button, else the battery is not protected.
|
|
|
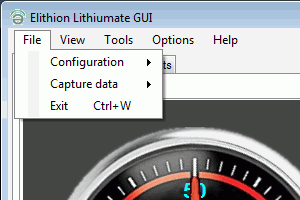
The "File" menu lets you:
- Configuration: read or write the configuration settings, from and to the BMS and from and to the computer's hard drive
- Capture: log BMS data to a file
- Quit
|
|
|
The "View" menu lets you select a screen,
|
|
|
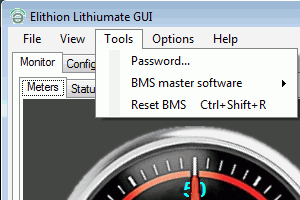
The "Tools" menu lets you:
- Set or enter a password
- Upgrade the BMS master's software
- Reser the BMS master
|
|
|
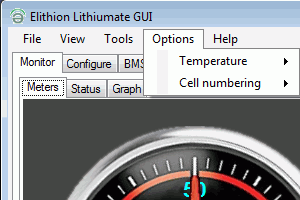
The "Options" menu lets you:
- Set the way the cells are numbered
- Set which temperature is shown: cells or cell boards
|
|
|
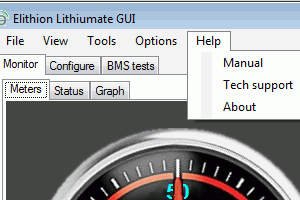
The "Help" menu lets you:
- Go to this manual
- Contact tech support
- See info about the GUI application
|
|
|
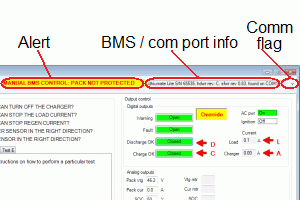
At the top of the window, the GUI gives additional information
- An alert line, to warn if the battery is not protected
- An information line about the BMS master and the USB port
- A flag that blinks during communication to the BMS master
|
|
- GUI application: If there are new revisions of the GUI software, it will automatically ask you permission to upgrade when you first start it, as long as the computer has an internet connection.
- BMS master software: upgrade instructions
|
You can capture the data into a log that can be opened by a spreadsheet program such as Excel.
- Select the File / Capture / File menu
- Enter a file name and browse for a locations
- When ready, click File / Capture / Start
- When done, click File / Capture / Start
- Find the CSV file in your hard drive and open it
- When prompted, specify that the delimiters is the tab character (and only the tab character)
|

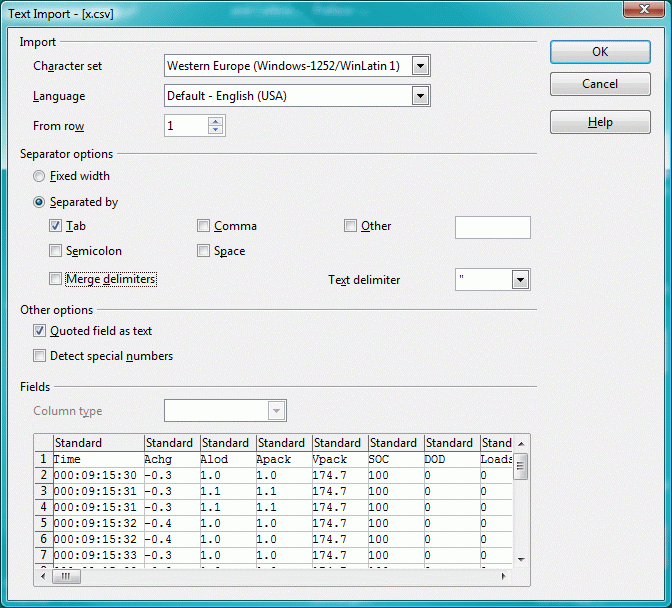
CSV file set-up in OpenOffice Calc
|
The data are:
- Time - Time since the BMS was powered [hhh:mm:ss]
- Achg - Current seen by the 30 A charger current sensor [A]
- Alod - Current seen by the 900 A load current sensor [A]
- Apack - Net battery current (total of the two values above) [A]
- Vpack - Pack voltage
- SOC - State Of Charge [%]
- DOD - Depth Of Discharge [Ah]
- Loads - Number of balancing loads on [-]
- BalVtg - Cell voltage below which no balancing will occur [V]
- BalCause - Code for the reason why balancing is or is not occurring
- 0: Cell board too hot
- 1: Voltages all within delta balance voltage
- 2: Voltages below min balance voltage
- 3: Cool down period
- 4: Not powered by the AC
- IoState - State of the inputs; left to right, "1" means:
- Digital outputs are overriden
- Analog outputs are overriden
- Fault out
- Warning out
- Discharge OK out
- Charge OK out
- there is power from the Ignition
- there is power from the AC line
- Flags - left to right, "1" means:
- (reserved)
- we're charging the battery
- we're discharging the battery
- (reserved)
- (reserved)
- (reserved)
- (reserved)
- (reserved)
- BankStatA - Code indicating the state of bank A (Elithion IP)
- BankStatB - Same, but for bank B
- BankStatC - Same, but for bank C
- BankStatD - Same, but for bank D
- BankStatE - Same, but for bank E
- BankStatF - Same, but for bank F
- BankStatG - Same, but for bank G
- BankStatH - Same, but for bank H
- CCL - Charge Current Limit [%]; 100 % = no limit
- CCLcause - Code for why the CCL is limited:
- 0: No limit
- 1: Pack voltage too low
- 2: Pack voltage high
- 3: Cell voltage low
- 4: Cell voltage high
- 5: Temperature high for charging
- 6: Temperature too low for charging
- 7: Temperature high for discharging
- 8: Temperature too low for discharging
- 9: Charging current peak lasted too long
- A: Discharging current peak lasted too long
- B: Charge testing
- C: Fault
- DCL - Discharge Current Limit [%]; 100 % = no limit
- DCLcause - Code for why the DCL is limited. See CCLcause table, above
- WarnFlags - Flags indicating a warning; left to right, "1" means:
- (reserved)
- (reserved)
- BMS test - no cells
- BMS test - load sensor reversed
- BMS test - charger sensor reversed
- BMS test - BMS unable to stop regen
- BMS test - BMS unable to stop load current
- BMS test - BMS unable to stop the charger
- Bank communication fault
- Plugged into AD and Ignition is on
- High cell voltage
- Low cell voltage
- Hot temperature
- Cold temperature
- Discharge overcurrent
- Charge overcurrent
- FltFlags - Flags indicating a warning; same definition as Warning flags, above
- MissBanks - Number of banks that are not communicating
- MissBank - The number of one of the banks that is not communicating: 0 = A, 1 = B, etc.
- MissCells - Number of cells that are not communicating
- MissCell - The number of one of the cells that is not communicating: 0 = most positive, 1 = next to the most positive, etc.
- Vmin - Instantaneous voltage of the cell with the lowest voltage [V]
- VminNo - Number of the cell with the lowest voltage [-]; 0 = most positive, 1 = next to the most positive, etc.
- VminAvg - Time average of the IR compensated minimum voltage [V]
- Vavg - Instantaneous average of all the cell voltages (not time averaged) [V]
- Vmax - Instantaneous voltage of the cell with the highest voltage [V]
- VmaxNo - Number of the cell with the highest voltage [-]; 0 = most positive, 1 = next to the most positive, etc.
- VmaxAvg - Time average of the IR compensated maximum voltage [V]
- Tmin - Mininum cell board temperature [°C]
- TminNo - Number of the coldest cell board; 0 = most positive, 1 = next to the most positive, etc.
- Tavg - Average cell board temperature (not time averaged) [°C]
- Tmax - Maximum cell board temperature [°C]
- TmaxNo - Number of the hottest cell board; 0 = most positive, 1 = next to the most positive, etc.
- Rmin - Resistance of the cell with the lowest resistance [mΩ]
- RminNo - Number of the cell with the lowest resistance [-]; 0 = most positive, 1 = next to the most positive, etc.
- Ravg - Average cell resistance (not time averaged) [mΩ]
- Rmax - Resistance of the cell with the highest resistance [mΩ]
- RmaxNo - Number of the cell with the highest resistance [-]; 0 = most positive, 1 = next to the most positive, etc.
- Rpack - Pack total resistance [mΩ]
- Nmonit - Number of the cell being monitored at the time (selected through the GUI, in the Status screen); 0 = most positive, 1 = next to the most positive, etc.
- Vmonit - Voltage of the cell being monitored at the time [V]
- Tmonit - Temperature of the cell being monitored at the time [°C]
- TmonitOff - Temperature of the cell being monitored at the time, the last time the balancing load was off [°C]
- Rmonit - Resistance of the cell being monitored at the time [mΩ]
- Smonit - Code for the state of the cell being monitored at the time (Elithion IP)
- Cell 0 - Data for cell 0 (the most positive cell), depending which item waws selected in the histogram in the GUI application at the time: voltage [V] or temperature [°C], or resistance [mΩ]
- Cell 1 - Same, but for cell 1
- Cell 2 - Same, but for cell 2
- ...
- Cell n - Same, but for cell n, the last cell used
|
|